
PiHole is a service that prevents advertisements to be served to any device on your network. When a web browser or App tries to download an ad, Pi Hole checks to see if domain in the URL is an advertiser, and if so return that the domain is not found. Basically any ads get sucked into a black hole. PiHole is effectively a proxy to a real DNS (domain name service). A DNS translates a domain name we can easily read (ex. Google.com) and share to an IP address (ex. 172.217.164.206) the computer needs to connect to respective server.
This requires three main steps.
- Installing and configuring the PiHole service on a Raspberry Pi
- Configuring your home router to use PiHole as the DNS service to look up domains.
- Optional – Perform post configuration of PiHole. Add blocklists, whitelists and view stats.
Install PiHole
- Connect to your pi over terminal/cmd (Note: The IP of your Pi may differ)
ssh pi@192.168.1.20 - Install PiHole (ref: https://docs.pi-hole.net/main/basic-install/)
curl -sSL https://install.pi-hole.net | bash
As you run through the installation you can choose an Interface. Connecting the pi directly to your router by ethernet cable (eth0) is the preferred way since the connection is more reliable. Yet wifi works fine too (wlan0).
Upstream DNS Provider – This is the actual DNS server that will be called if PiHole isn’t configured to block the domain. Typical choices: Google, Cloudflare).
Blocklists – PiHole knows sites to block based on a blocklist. You can choose to select one or more of the proposed lists. You can add others later. Check out firebog.net for examples.
Protocols – Choose both IPv4 and IPv6
Static IP Address – Note the IP address displayed as we’ll need this later. Confirm that the Gateway IP is the same as your router IP address.
Continue installing by selecting the default options
Once installation is complete you will get a summary screen. Note this information down as you’ll need it to configure your router and to login and configure pihole.
You can access the web interface by going to http://192.168.1.20/admin
Configure your Router
Login to your router using the gateway address and the user/password for your router. Check this site for the default user/password assuming you didn’t change it when you first set up your router. https://www.routerpasswords.com/
Find the DNS configuration for your router and change it to point to your raspberry pi. The address of the pi is the IPv4 address listed on the summary screen : ex. 192.168.1.20
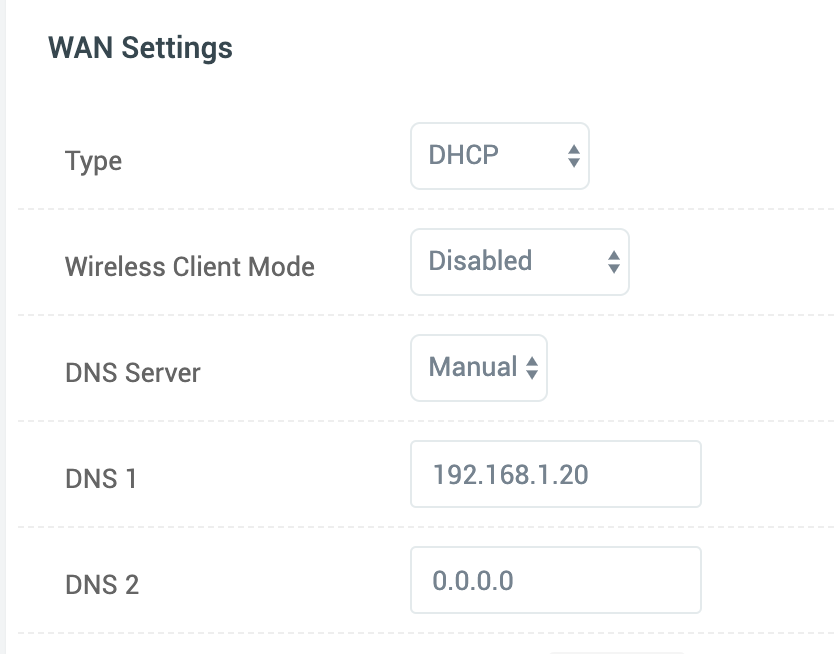
For example on a Tomato router, go to Basic Settings > Network > WAN Settings > DNS Server
Set to Manual
Set the DNS 1 value to the pi address and save.
Upgrading PiHole
- Connect to your pi over terminal/cmd
ssh pi@192.168.1.20 - Command: pihole -up
Added Security – DNS Over HTTPS
Optional but worth looking into for added security. This secures the connection to the DNS server so that no one can snoop on what websites you visit.
Check the Pi-Hole Docs for more information.