Can you build a self-hosted AI solution that rivals ChatGPT, Claude, and Gemini with minimal cost, while running on an older laptop with no GPU and just 16GB of RAM?
That was the question I set out to answer. My goal was twofold: create a powerful, private AI sandbox and breathe new life into aging hardware that was gathering dust. Here is a breakdown of what I tried, where I hit roadblocks, and the hybrid architecture I ultimately landed on.
System Architecture Overview
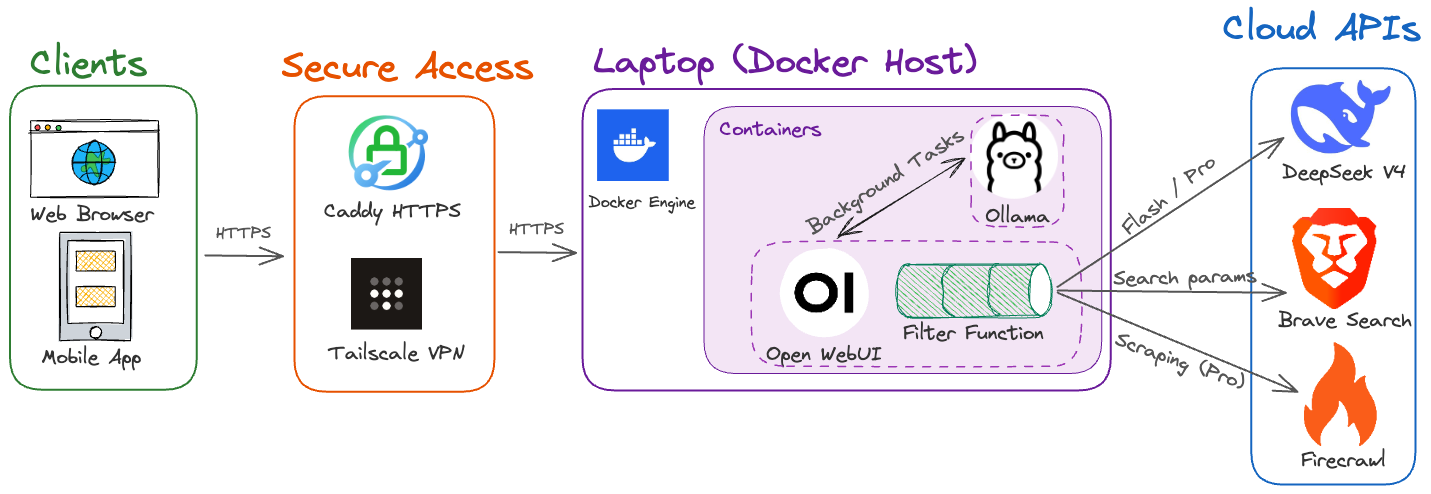
Before diving into the setup, here is a high-level look at how all the pieces connect, routing local tasks to internal models while sending heavy reasoning and web search to external APIs.
The Starting Point: Docker, Ollama, and Open WebUI
I started entirely local. The foundation of my stack involved deploying Ollama and Open WebUIwithin Docker containers. This combination provides a clean, ChatGPT-like interface over locally executed models.
Because my system was limited to 16GB of CPU-only RAM, I focused on smaller, quantized models that could fit in memory and run efficiently. I tested models like gemma4:e2b and llama3.2:3b, tweaking advanced parameters to optimize performance. For standard chat, it worked surprisingly well. The models generated text at a respectable clip, proving that you do not strictly need a massive GPU for basic text generation.
The Roadblock: Web Search and the Intelligence Ceiling
The cracks began to show when I tried to make the AI agentic, specifically giving it web search capabilities.
I initially set up SearXNG as a self-hosted search aggregator. However, I quickly ran into IP blocking and CAPTCHA issues from upstream engines like Google and Startpage. Even after optimizing SearXNG to use less aggressive engines, a larger issue emerged.
Small local models simply lacked the parameter depth and reasoning capabilities to reliably execute tool calls, parse search results, and synthesize new information. When you have access to free tiers of massive frontier models like Gemini or DeepSeek, relying entirely on a struggling local model for complex tasks just is not a viable daily use case.
The Pivot: A Hybrid Architecture
Instead of fighting the hardware limitations, I pivoted to a hybrid approach: using my local server as the interface and router, while offloading the heavy lifting to the cloud.
The Core Engine (DeepSeek V4): I configured Open WebUI to connect externally to DeepSeek V4 via API. It currently offers the most competitively priced intelligence on the market, matching frontier models while keeping costs negligible.
The Local Task Model: I did not abandon local models entirely. Open WebUI uses a background Task Model to quietly generate chat titles and construct search queries. I assigned LiquidAI/lfm2.5-350m:q4_k_m to this role. Its ultra-lightweight hybrid architecture is purpose-built for CPU-only edge deployment, allowing it to handle fast function calling and background structured outputs with near-zero latency and minimal RAM overhead.
Search via Free APIs: To solve the web search issue without managing SearXNG blocks, I plugged in the free developer tiers of Brave Search and Firecrawl. This gave my external models reliable, real-time web access without the CAPTCHA headaches.
Fine-Tuning the Experience & Maxing Out Savings
To keep API costs as low as possible, fined tuned Web Search parameters and installed a custom Python Filter in Open WebUI. Filters allow you to execute arbitrary Python code to intercept and modify requests before they hit the LLM. I used a filter to manage context windows and trim unnecessary chat history, ensuring I was only sending essential tokens to the DeepSeek API.
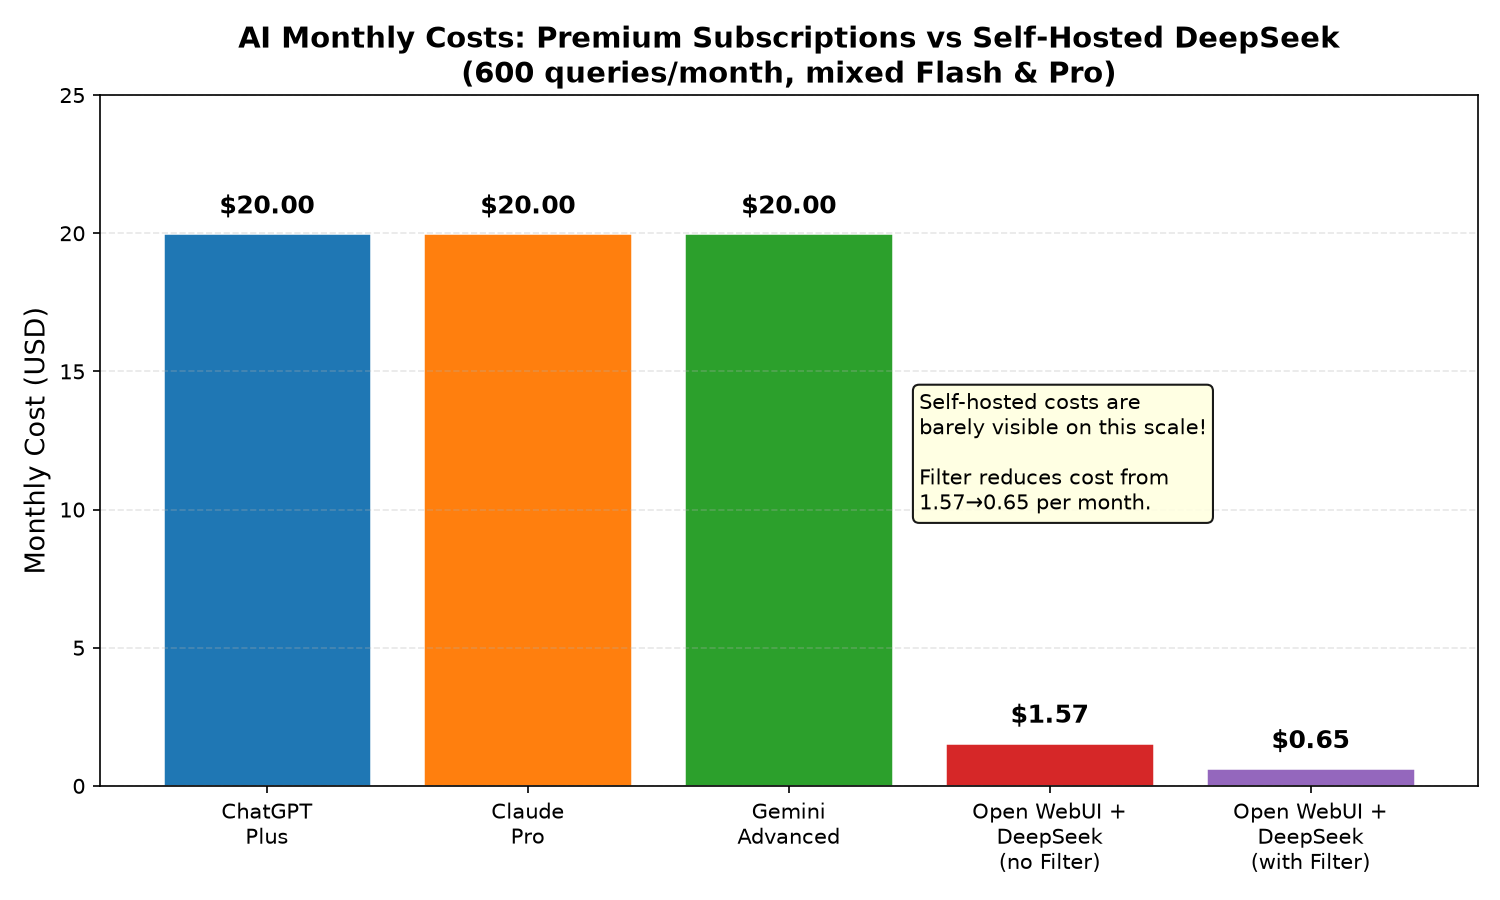
The financial results were impressive. Implementing this single filter drove nearly a 60% cost reduction for DeepSeek queries, dropping estimated monthly usage costs to less than a dollar. These savings compound quickly across a larger team or organization. On a personal level, Open WebUI’s multi-account support makes it just as easy to spin up private accounts for family members without versus multiple paid accounts.
Going Mobile & Securing Access
Finally, I needed to make this accessible outside my home network. I placed the entire Docker stack behind a Caddy web proxy, securing it with HTTPS so I could access it safely from the public internet. Tailscale is another great zero-trust alternative here.
For mobile access, Open WebUI’s Progressive Web App works great natively. However, I also tested dedicated iOS clients and found the Liquid Apollo app to be particularly nice. It allows you to plug in your custom backend URL and gives you a slick, native iOS interface to chat with your home server plus you can run local AI models directly on device.
The Proof of Concept & Enterprise Potential
Although I built this proof-of-concept using free tier services like Brave Search API and Firecrawl hosted on an old personal laptop, the underlying design architecture goes far beyond a hobbyist setup:
Enterprise Scalability: In enterprise environments, this exact architecture can easily be scaled to run on managed cloud infrastructure like AWS EKS, Azure Container Apps, or GCP with high availability and automated load balancing.
Security & IAM Integration: Open WebUI natively supports enterprise-grade Access Control, allowing organizations to configure fine-grained user permissions and integrate directly with Enterprise Identity and Access Management solutions via OAuth2 and OIDC, such as Okta, Azure AD, or Keycloak.
What I Learned (and What You Should Steal)
Local models are amazing – for the right tasks. They’re perfect for background jobs (titling, tagging) or ultra‑private conversations where you never want data to leave your device. But for serious web‑augmented Q&A, even the best 7B model on CPU can’t compete with a cloud API that costs $0.001 per query.
Cheap cloud ≠ giving up control. Using DeepSeek’s API from your own Open WebUI instance means you own your data pipeline, can switch providers anytime, and never lock into a proprietary UI.
Automation is the secret sauce. That tiny Filter function eliminated all mental overhead – I just pick a model and the right search settings fire automatically. It’s a perfect example of how a little code can make self‑hosted AI feel polished.
Old hardware still has a place. My laptop now hums quietly as an AI server, and with external API calls, its CPU is barely taxed. It’s the brain that orchestrates, not the muscle that computes.
The Verdict
By accepting the limits of older hardware and adopting a hybrid approach, I successfully turned a dusty 16GB laptop into a centralized AI hub. It provides a top-tier, agentic AI experience that rivals $20/month subscriptions for literal pennies, all while keeping the flexibility to change AI providers at any time.
Want to run this setup yourself?
Below is the sanitized Docker Compose stack to get Open WebUI up and running with Brave Search enabled. Just plug in your own API keys in the environment section:
version: '3.8'

services:
  open-webui:
    image: ghcr.io/open-webui/open-webui:main
    container_name: open-webui
    restart: unless-stopped
    ports:
      - "3500:8080"
    environment:
      # Connect to Ollama running on host system
      - OLLAMA_BASE_URL=http://host.docker.internal:11434

      # Security & Tokens (Replace with your own values)
      - HF_TOKEN=your_huggingface_token_here
      - WEBUI_SECRET_KEY=generate_a_random_32_byte_hex_key_here

      # Web Search Configuration (Brave Search API)
      - ENABLE_WEB_SEARCH=true
      - WEB_SEARCH_ENGINE=brave_llm_context
      - BRAVE_SEARCH_API_KEY=your_brave_search_api_key_here
      - BRAVE_SEARCH_CONTEXT_TOKENS=8192
      - BYPASS_WEB_SEARCH_EMBEDDING_AND_RETRIEVAL=false
      - WEB_SEARCH_RESULT_COUNT=6
      - WEB_SEARCH_CONCURRENT_REQUESTS=2
      - WEBUI_REQUEST_SSL_VERIFY=false
      - FIRECRAWL_API_KEY=your_firecrawl_api_key
      - WEB_LOADER_ENGINE=firecrawl
    extra_hosts:
      - "host.docker.internal:host-gateway"
    volumes:
      - open-webui-data:/app/backend/data

volumes:
  open-webui-data:
    name: open-webui
    driver: local
Here is the Python filter code I used in Open WebUI to manage the context window:
from typing import Dict, Optional


class Filter:
    def inlet(self, body: dict, __user__: Optional[dict] = None) -> dict:
        model = body.get("model", "").lower()

        # ---------- DeepSeek Flash: low-token, high-quality quick search ----------
        if "deepseek-v4-flash" in model:
            body.setdefault("features", {})["web_search"] = True
            body["web_search"] = {
                "engine": "brave_llm_context",
                "context_size": 4096,
                "result_count": 2,
                "concurrent_requests": 1,
                "fetch_url_content_length": 2000,
                "bypass_embedding_and_retrieval": False,
                "bypass_web_loader": True,
                "web_loader_engine": "firecrawl",
                "web_loader_concurrent_requests": 1,
            }

        # ---------- DeepSeek Pro: deep research, still token‑aware ----------
        elif "deepseek-v4-pro" in model:
            body.setdefault("features", {})["web_search"] = True
            body["web_search"] = {
                "engine": "brave_llm_context",
                "context_size": 12288,
                "result_count": 4,
                "concurrent_requests": 2,
                "fetch_url_content_length": 4000,
                "bypass_embedding_and_retrieval": False,
                "bypass_web_loader": False,
                "web_loader_engine": "firecrawl",
                "web_loader_concurrent_requests": 2,
            }

        # Local models: do nothing — let the UI toggle dictate web search

        return body
(To install this, go to Admin Panel -> Functions -> Create New Function in Open WebUI, paste the code, and set the function type to Filter.)
Here is the Python filter code I used in Open WebUI to manage the context window:
from typing import Dict, Optional


class Filter:
    def inlet(self, body: dict, __user__: Optional[dict] = None) -> dict:
        model = body.get("model", "").lower()

        # ---------- DeepSeek Flash: low-token, high-quality quick search ----------
        if "deepseek-v4-flash" in model:
            body.setdefault("features", {})["web_search"] = True
            body["web_search"] = {
                "engine": "brave_llm_context",
                "context_size": 4096,
                "result_count": 2,
                "concurrent_requests": 1,
                "fetch_url_content_length": 2000,
                "bypass_embedding_and_retrieval": False,
                "bypass_web_loader": True,
                "web_loader_engine": "firecrawl",
                "web_loader_concurrent_requests": 1,
            }

        # ---------- DeepSeek Pro: deep research, still token‑aware ----------
        elif "deepseek-v4-pro" in model:
            body.setdefault("features", {})["web_search"] = True
            body["web_search"] = {
                "engine": "brave_llm_context",
                "context_size": 12288,
                "result_count": 4,
                "concurrent_requests": 2,
                "fetch_url_content_length": 4000,
                "bypass_embedding_and_retrieval": False,
                "bypass_web_loader": False,
                "web_loader_engine": "firecrawl",
                "web_loader_concurrent_requests": 2,
            }

        # Local models: do nothing — let the UI toggle dictate web search

        return body
(To install this, go to Admin Panel -> Functions -> Create New Function in Open WebUI, paste the code, and set the function type to Filter.)
Here is the Python filter code I used in Open WebUI to manage the context window:
from typing import Dict, Optional


class Filter:
    def inlet(self, body: dict, __user__: Optional[dict] = None) -> dict:
        model = body.get("model", "").lower()

        # ---------- DeepSeek Flash: low-token, high-quality quick search ----------
        if "deepseek-v4-flash" in model:
            body.setdefault("features", {})["web_search"] = True
            body["web_search"] = {
                "engine": "brave_llm_context",
                "context_size": 4096,
                "result_count": 2,
                "concurrent_requests": 1,
                "fetch_url_content_length": 2000,
                "bypass_embedding_and_retrieval": False,
                "bypass_web_loader": True,
                "web_loader_engine": "firecrawl",
                "web_loader_concurrent_requests": 1,
            }

        # ---------- DeepSeek Pro: deep research, still token‑aware ----------
        elif "deepseek-v4-pro" in model:
            body.setdefault("features", {})["web_search"] = True
            body["web_search"] = {
                "engine": "brave_llm_context",
                "context_size": 12288,
                "result_count": 4,
                "concurrent_requests": 2,
                "fetch_url_content_length": 4000,
                "bypass_embedding_and_retrieval": False,
                "bypass_web_loader": False,
                "web_loader_engine": "firecrawl",
                "web_loader_concurrent_requests": 2,
            }

        # Local models: do nothing — let the UI toggle dictate web search

        return body
(To install this, go to Admin Panel -> Functions -> Create New Function in Open WebUI, paste the code, and set the function type to Filter.)
DeepSeek Flash Settings (Fast & Cheap)
Why these values?
context_size: 4096 – Enough for a thorough summary of 2 sources. Most factual queries don’t need more; going higher wastes tokens without better answers.
result_count: 2 – Two high-quality Brave summaries are plenty for quick lookups. Each additional result adds ~1–2K tokens.
concurrent_requests: 1 – Avoids Brave rate limits on the free tier. Flash is fast enough that sequential requests don’t hurt.
bypass_web_loader: True – No page scraping. Brave’s LLM context is already well-structured; scraping would add latency and tokens for marginal gain on simple queries.
bypass_embedding_and_retrieval: False – Kept on. The embedding pipeline adds negligible cost for Flash (small context) and improves result relevance.
Result: ~1,200–2,500 tokens of search context. A typical Flash query costs under $0.002.
DeepSeek Pro Settings (Deep Research)
Why these values?
context_size: 12288 – 12K tokens strikes the balance between depth and cost. Full 16K often includes redundant content; 12K captures the substance without bloat.
result_count: 4 – More sources for complex topics, but not so many that the model gets lost. Four diverse perspectives usually cover the ground.
bypass_web_loader: False – Enables Firecrawl to fetch and scrape full pages. This is the key difference from Flash: Pro gets actual page content, not just summaries.
fetch_url_content_length: 4000 – Enough to capture meaningful sections of each scraped page without pulling in entire articles. 4000 chars per result × 4 results = rich context.
web_loader_concurrent_requests: 2 – Scrapes 2 pages at once, halving the wait time without overwhelming the Firecrawl free tier.
concurrent_requests: 2 – Two Brave searches in parallel; with scraping enabled, the extra concurrency keeps total latency reasonable.
Result: ~4,000–8,000 tokens of deep, sourced context. A Pro query costs under $0.01 while rivaling the research depth of premium chatbots.